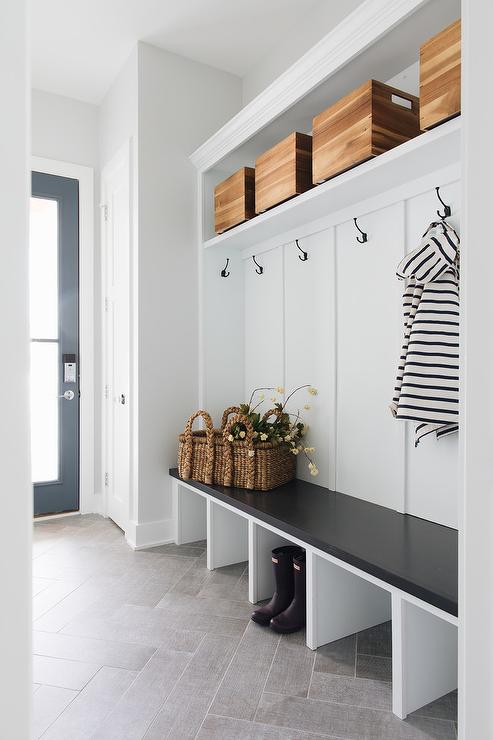
Open Bottom Mudroom Bench


The most functional type of mudroom bench is also the easiest and least expensive to build! See also: Matching Mudroom Hutch Template
I love this type of mudroom bench because
- Open bottom, so dirty shoes aren't on a shelf
- Maximum storage, no raised bottom shelf consuming space
- Can do corners easily, and still access the corner contents
- Easy to slide baskets or tubs underneath
- Easy to place shoes underneath
- Easy to sweep or vacuum out
- Very customize-able to just about any space
- Can be notched out for baseboard heaters or floor vents
- Inexpensive and easy to build!
Inspiration
This mudroom bench style is a classic from all the reasons listed above. Here are some inspiration photos to help you design your own!

Photo by Timber Trails Development


Image source unknown


source: m house development website
So can we just agree that this is an awesome way to do a mudroom?
Video Tutorial of Building this Mudroom Bench
Configuration
Our Shelf Help Configurator will help you get all the math right and visualize the design. We recommend a depth of 15.25" or 20.25" and a height of 17.25". Bays can be any number, used to divide up the structural load and organize the contents underneath - just try to keep bay width under 36".
- Height = 17.25"
- Width = Any Width
- Depth = 15.25", 20.25" or 23.25"
- Bays = Customize-able, use to keep the spans less than 36" to avoid sagging shelves/seat
- Shelves = optional, set to 0 for no shelves (open to floor)
Carcass Assembly
Cut 1x3 or 1x4 bay supports as shown in the below diagram to your bay widths. Attach with 3/4" pocket holes and 1-1/4" pocket hole screws, all pocket holes on outsides.

Remove baseboard on wall and place bench in place. Secure to studs in the wall with 2-1/2" long self tapping wood construction screws through the back bay supports.
Face Frame
A face frame is recommended for the front to give structure to the legs and keep the legs in place.
Measure and cut the face frame to fit the dimensions of the completed carcass. You can run the top continuous, or do the legs first and piece in the top (sometimes this is good when the top is too long for a continuous board)
Nail and glue the entire front face frame to the front with 1-1/4" brad nails.

Top
We recommend a top of 1x boards, joined together with pocket holes.
Measure and cut to length. Join the 1x8 boards edge to edge with 3/4" pocket holes and 1-1/4" pocket hole screws, one screw joint about every 8".

Attach to top of the bench with 1-1/4" screws (yes, you can use the pocket hole screws) from underneath.
You can also attach with brad nails and glue for further support.
Hutch
You can add any top or hutch. We also have created a free hutch template as shown below in the diagram.

Start Designing
Ready to design your own mudroom? Measure your space and start designing using our Free Shelf Configurator.