Horizontal Closet Organizer
More shelving space, everything within easy reach (no bending over), and fully customize-able to any closet width, this horizontal closet organizer will transform your closet space on a budget.

Horizontal Closet Organizer Features
- More shelving at an easy to reach height for folded items like pants, t-shirts, and baskets for smaller items
- A top shelf above the organizer for out of season items in a full length width, so fits many size totes, bins or baskets
- No bending over and reaching with the hangers at mid height
- Economical and easy to build
- Easy to customize to just about any width and height
- NO removing baseboard or trim
Designing Your Horizontal Closet Organizer
This horizontal closet organizer is super easy to design and build, but there are a few things to consider before tackling it.
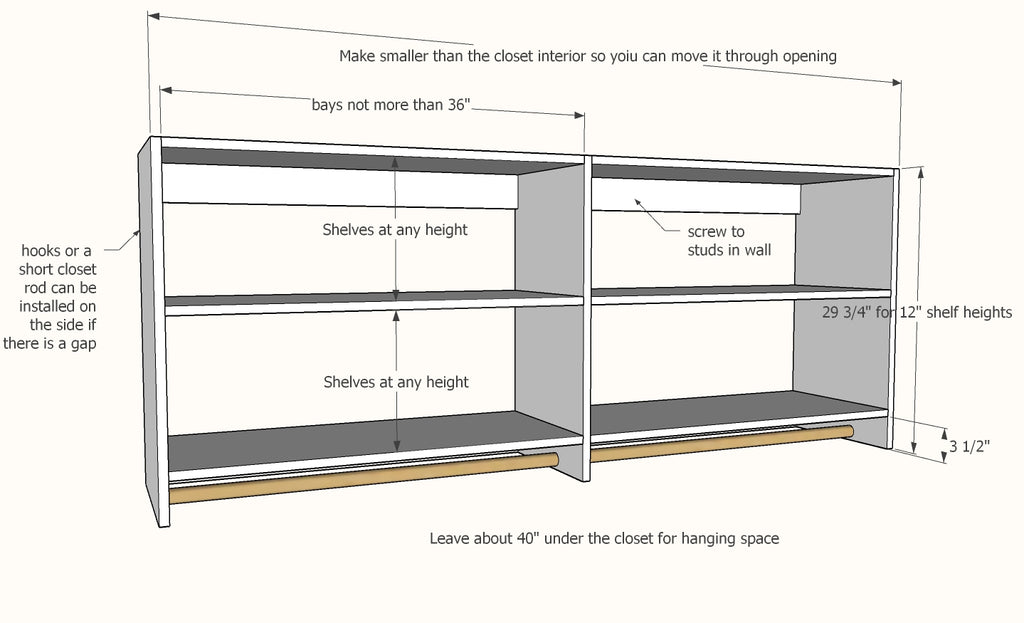
- Make the organizer a little smaller so you can move it through the closet opening and rotate it (or build it in pieces in place)
- If there is space on the sides of the closet once it is installed, you can use this space for hanging dresses or taller items
- Widths of bays can be up to 36" - longer widths may sag
- For extra long closets, you can add as many bays as you'd like, but consider when the organizer is super long it gets hard to maneuver and install - so it may be better to break up into multiple organizers that are easy to handle.
- Shelves can be any height, 10-12" is pretty standard
- Leave 3-1/2" under the bottom shelf for the closet rod
- About 40" under the organizer is needed for hanging space.
Configuring Your Closet Organizer
Use our free, easy configurator to create your design in seconds.

- Width = Closet Opening width
- Height = About 30" - depends on how tall you want your shelves and the hanging space underneath. Also consider the top is a shelf too.
- Depth = 15-1/4"
- Bays = Adjust so shelf widths does not exceed 36"
Assembling the Carcass
Once your Shelf Help carcass arrives, it's easy to assemble. Just drill three 3/4" pocket holes on each end of all the shelf boards and attach to the vertical sides/dividers. The top shelf pocket holes should face upward, the bottom shelf and middle shelf pocket holes face downward.
3-1/2" should be left under the bottom shelf to allow for bay supports and hanging the closet rod.

NOTE: It may be a good time to check to see if you can fit the organizer inside your closet at this point, or if you need to build the organizer in steps inside the closet.
Bay Supports
Bay supports add structure and a cleat for hanging. This plan uses 1x4s for the bay supports.
 Attach the bay supports from the back with pocket holes to both the vertical dividers and the shelves.
We recommend painting or staining at this step.
Hanging and Closet Rods
Locate studs in the wall in the closet and mark.
Hang the closet organizer to the studs in the wall with screws, normal framed walls require a 3" self tapping construction screw. Look for the star bit ones - they work well and save time.
Check to make sure the organizer is level.

Cut closet rod dowels (1-1/4" is standard) to match shelf lengths and install using closet rod sockets (available at most home improvement stores).