Console Cabinet with Basket Shelf
Create a custom sized console drop zone with baskets with this free template.
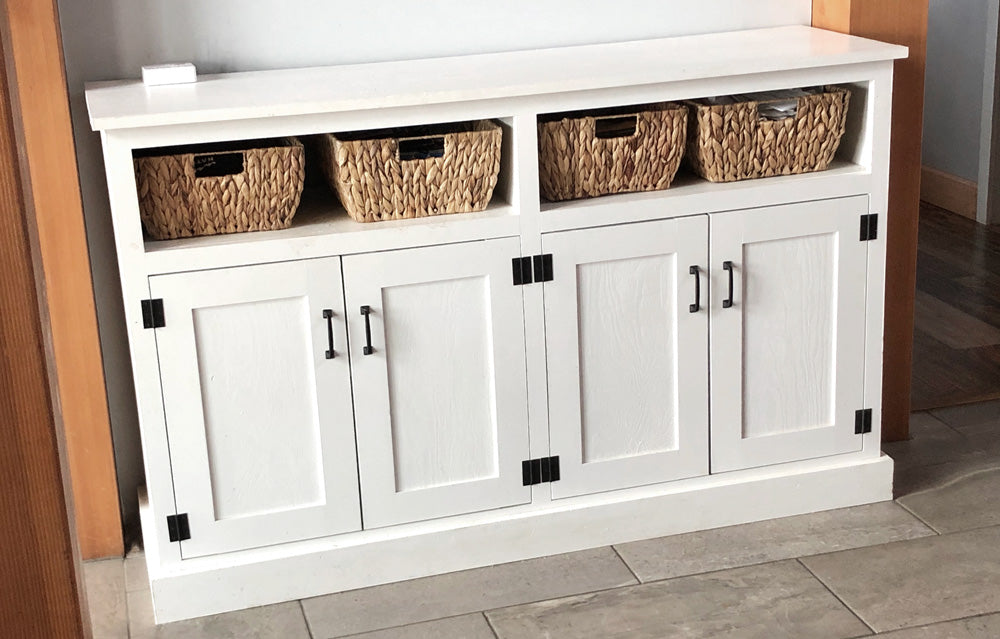
We love this console - it is one the hardest working pieces in our home. I couldn't recommend it more, and love the baskets instead of drawers, because you can remove the basket and sort through easily - and it's a nice texture change!
The best part about this console is it's designed to be customized in size! You can easily customize the width with a few clicks, and also customize the height of the basket area with just a mouse drag. And let's not forget about customizing the finish!

Here's how to configure and build your own.
Recommended Tools and Materials
- Shelf Help Carcass created in the Design Configurator
- 1x3 or 1x4s for Bay Supports
- 1x6 or similar for top
- Wood base moulding
- Doors and hinges
- Pocket hole jig and 1-1/4" pocket hole screws
- Brad nailer and 1-1/4" brad nails
- Miter saw or miter box with hand saw
- Drill
Configuration
Use the design configurator to create the carcass as shown in the diagram. You can add additional bays (or just go with one bay) - just keep the shelf span under 36" to avoid sagging. I used the 15-1/4" plywood width, but for narrower consoles (or deeper) you can use the other widths.

Here is the design configuration I used for the carcass used in this template:
- Width = 58-1/4"
- Height = 35-1/4"
- Depth = 15-1/4"
- Bays = 2
Bay Supports
For each bay, I recommend four bay supports placed as shown below. The bay supports are equal to your shelf lengths.

Top
I recommend using 1x6 boards for a top for the 15-1/4" wide carcass. Join the 1x6 boards together first with a pocket hole jig. Then attach from underneath with a couple of 1-1/4" screws (can be angled if you can't get your drill inside the shelf completely).

If you are using a different depth, you'll want to create a top that is about 1" wider than the depth of your carcass. You can use a combination of board widths (for example, 1x6 + 1x8 = 12-3/4" for the narrower width).
Baseboard
I love enclosed bases because it keeps things clean underneath the cabinet. If you have vents under your cabinet, you can leave it open, or cut the baseboard out for a vent as well.

The baseboard should be mitered at 45 degree bevels at the corner and nailed on with 1-1/4" long brad nails and glue.
Doors
You can make your own doors or order the doors from a cabinet door company. I recommend making the doors 1/4" less than the opening as shown in the diagram.
There are two different ways to hinge the doors on.
1. Concealed Hinges like these are hidden inside and easy to hide and very adjustable, but are more expensive. Look for "Frameless Full Inset" on the label.
2. Surface Mount hinges like these are easy to install, but they are visible from the outside, and you will most likely need a magnetic clasp to keep the door shut when closed.
Shelves
Since the doors are inset, you can't use the same width material for any optional shelves. Instead, order blanks with the narrower width equal to the shelf lengths.
To order blanks, in the Design Configurator, set Bay = 0, then input the length desired in the height field and choose the desired width.
